The main purpose of "Dot Net Labs" provide the dot net program. You can learn dot net, .Net Core, C#, SQL, Linq step-by-step.

Sunday, 3 July 2016

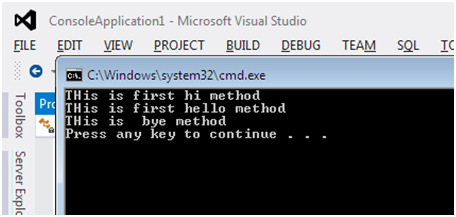
Interface in c# with simple example


Hello friends, we will learn about interface in c#. An interface is declared using the keyword interface. The interface contains only abstract members, just like the classes interface also contains properties, methods, delegates, or events, but an only declaration, no implementations. An interface cannot be instantiated but can only be inherited by classes or other interfaces.

Example:

using System;
using System.Collections.Generic;
using System.Linq;
using System.Text;
using System.Threading.Tasks;

namespace ConsoleApplication1
{
    interface first
    {
        void hi();
        void hello();
    }
    class Test : first
    {
        public void hi()
        {
            Console.WriteLine("THis is first hi method");
        }
        public void hello()
        {
            Console.WriteLine("THis is first hello method");
        }
        public void bye()
        {
            Console.WriteLine("THis is  bye method");
        }
    }

    class Program
    {

        static void Main(string[] args)
        {
            first f = new Test();
            f.hi();
            f.hello();
            Test t1 = new Test();
            t1.bye();

        }
    }

}


There are two types of implementation of interfaces.
    • Implicit interface implementation
    • Explicit interface implementation

Example: The following is an example of Implicit interface implementation.

interface IEmployee

{

    void GetEmployee();

}


class Class1 : IEmployee

{


    public void GetEmployee()

    {

        Console.WriteLine("Implicit interface implementation.");

    }

 }


class Program

{

    static void Main(string[] args)

    {

        Class1 objClass1 = new Class1();

        objClass1.GetEmployee();

    }

}


Example: The following is an example of Explicit interface implementation.

interface IEmployee

{

    void GetEmployee();

}


interface IEmployee2

{

    void GetEmployee();

}


class Class1 : IEmployee, IEmployee2

{


    void IEmployee.GetEmployee()

    {

        Console.WriteLine("IEmployee Explicit interface inplementaion.");

    }


    void IEmployee2.GetEmployee()

    {

        Console.WriteLine("IEmployee2 Explicit interface inplementaion.");

    }

}


class Program

{

    static void Main(string[] args)

    {

          //Type 1

        Class1 objClass1 = new Class1();

        ((IEmployee)objClass1).GetEmployee();

        ((IEmployee2 )objClass1).GetEmployee();


        //Type 2


        IEmployee obj = new Class1();

        obj.GetEmployee();


         IEmployee2 obj = new Class1();

        obj.GetEmployee();


    }

}
Simple example of Property in C#


Hello friends, here we will learn properties in c#. Properties allow you to control the accessibility of a class variable, and way to access variables from the outside in c#.

Types of properties in C#
    • Read/Write properties - set and get
    • Read only properties - get only
    • Write only properties - set only
    • Auto implemented properties - public int Id {get;set;};

Example:

using System;
using System.Collections.Generic;
using System.Linq;
using System.Text;
using System.Threading.Tasks;

namespace ConsoleApplication1
{

    class Test
    {
        private int roll;
        private string name;
        public int Roll
        {
            get
            {
                return roll;
            }
            set
            {
                roll = value;
            }
        }
        public string Name
        {
            get
            {
                return name;
            }
            set
            {
                name = value;
            }

        }

    }
    class Program
    {

        static void Main(string[] args)
        {
            Test t = new Test();
            Console.WriteLine("Enter the roll no :");
            t.Roll = Convert.ToInt32(Console.ReadLine());
            Console.WriteLine("Enter the name");
            t.Name = Console.ReadLine();
            Console.WriteLine("Your roll no is " + t.Roll);
            Console.WriteLine("Your roll no is " + t.Name);


        }
   }
}


Thursday, 12 May 2016

Add two number in asp.net as a modular programming


using System;
using System.Collections.Generic;
using System.Linq;
using System.Text;
using System.Threading.Tasks;

namespace modularpro
{
    class test
    {
        int a, b, c;
        public void getdata()
        {
          
            Console.Write("Enter the a number : ");
            a = Convert.ToInt32(Console.ReadLine());
            Console.Write("Enter the b number : ");
            b = Convert.ToInt32(Console.ReadLine());
           
           
        }
        public void showdata()
        {
            c = a + b;
            Console.Write("Your is  :"+c);
           
        }
    }
    class Program
    {
        static void Main(string[] args)
        {
            test t1 = new test();
            t1.getdata();
            t1.showdata();
            Console.ReadLine();
        }
    }
}


The output is following :


Friday, 19 June 2015

Operator in C#


Arithmetic Operators
+Addition
-Subtraction
*Multiplication
/Divided
%Modulus
++Increment Operator
--Decrement Operator
Relational Operators
==Equal To
!=Not Equal
<Less Than
>Greater Than
>=Greater Than or Equal
<=Less Than or Equal to
Logical Operators
&&Logical AND operator
||Logical OR Operator
!Logical NOT Operator
Bitwise Operators
&AND Operator
|OR Operator
^XOR Operator
~Ones Complement Operator
<<Left Shift Operator
>>Right Shift Operator
Assignment Operators
=Assignment Operator
+=Add assignment Operator
-=Sub assignment Operator
*=Multiply assignment Operator
/=Divide assignment Operator
%=Modulus assignment Operator
<<=Left shift assignment Operator
>>=Right shift assignment Operator
&=Bitwise assignment Operator
^=bitwise exclusive OR assignment Operator
|=bitwise inclusive OR assignment Operator

Saturday, 30 May 2015

SIZEOF Keyword Example : It shows the size of Data types


We will learn about sizeof() with the help of the example. Here sizeof() is an operator in c#. It used to obtain the size of a data type in bytes and works only on compile-time. It does not work with the variable and instance.

Example:

using System;
using System.Collections.Generic;
using System.Linq;
using System.Text;
using System.Threading.Tasks;

namespace DataTypesDemo
{
class Program
{
static void Main(string[] args)
{
Console.WriteLine("The size of short is {0} bytes.",sizeof(short));
Console.WriteLine("The size of int is {0} bytes.", sizeof(int));
Console.WriteLine("The size of long is {0} bytes.", sizeof(long));
Console.WriteLine("The size of float is {0} bytes.", sizeof(float));
Console.WriteLine("The size of double is {0} bytes.", sizeof(double));
Console.WriteLine("The size of char is {0} bytes.", sizeof(char));

Console.ReadLine();
}
}
}


Command Line Arguments Demo : Enter the Arguments on execution time


Step 1: Enter the below program in “Notepad”

using System;
class CommandLineDemo
{
static void Main(string []args)
{
Console.WriteLine("Welcome to CommandLine Arguments Demo");
Console.WriteLine("First argument is :"+ args[0]);
Console.WriteLine("Second argument is :"+ args[1]);
Console.ReadLine();
}
}

Step 2 : Save with extention “ <file_name>.cs”

Step 3 : Open Visual Studio Command Prompt


Step 4 : Open command prompt as below


Step 5 : Enter the file location by command “ cd ” and for exit command “ cd.. “


Step 6 : Compile to file with “ csc <file_name>.cs “


Step : 7 Execute program with “ <file name>.exe dot_net c_csharp “


Wednesday, 27 May 2015

How to save C# program in Notepad


To save a C# program using Notepad, you can follow these steps:

Open Notepad

Open the Notepad application on your computer. You can usually find it by searching for "Notepad" in the Start menu.

Write your C# program

In Notepad, write or copy-paste your C# program code into the editor.

Save the file

To save the file, go to "File" in the menu bar and click on "Save" or use the keyboard shortcut Ctrl + S.

Choose a file name

In the Save dialog, choose a name for your C# program file. Make sure to give it a .cs extension to indicate that it's a C# source code file. For example, you can name it "MyProgram.cs".

Select a location

Choose a location on your computer where you want to save the file. It could be your desktop or a specific folder.

Save the file

Click on the "Save" button to save the C# program file with the chosen name and location.


Step 1 : File save with file extention " .cs "


Step 2 : Open developer command prompt for compiling


Step 3 : Find Location of saved file


Step 4 : To compile file on command with " csc <file_name>.cs "


Step 5 : To run and output command with " <file_name>.exe "


Popular Posts